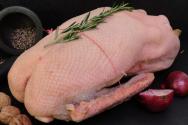
FominaOlesya: Gluten-free “Chocolate Cake” mix from Garnec. Let's prepare a cake with cherries and sour cream. Chocolate Sacher Torte For cherry filling
Hi all
Today there will be a very tasty review. I warn you, you shouldn't read it before going to bed.
I'm constantly looking for new recipes gluten-free sweets. And this time the finished mixture caught my eye - "Chocolate cake" from Garnets .
Its name speaks for itself, so we will prepare a cake, not a simple one, but a chocolate one with cherry filling and sour cream

This is what the hero of the occasion looks like. Thick paper packaging, and in it a mixture weighing 500 grams. Its price is 205 rubles.

In the mixture no wheat flour, but it is this that is usually the main component in traditional baking. In our case, based rice flour supplemented with different types of starch

The composition of this mixture is quite simple, and it seems that you can easily repeat it yourself. I think, with the right desire, this is true. But still Proportions are very important in gluten-free baking., so I won't take any risks.
In addition, the packaging provides complete information about the manufacturer, method of use and nutritional value of the mixture. There is a mark on the package gluten free, so no cheating

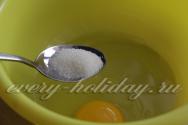
This is what the mixture itself looks like, like regular flour and cocoa. The only thing is that sugar has already been added there and its grains can be felt under your fingers.

Let's get started
So, for our cake you will need springform pan with a diameter of 24 centimeters.
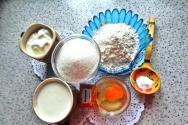
For the biscuit

For cream
- 1 kg sour cream. Take 2 packages of your favorite sour cream, even if they are not strictly 500 grams.
- 1 cup powdered sugar
- vanilla optional
For the cherry filling
- 1 pack of frozen cherries, 400 grams
- half a glass of water
- a quarter cup of sugar
- 1 tablespoon starch
For the glaze
- 50 grams butter
- 3 tablespoons milk
- 4 tablespoons each sugar and cocoa powder
Preparatory stage
To ensure that the sour cream is thick and holds its shape well in the cake, before starting cooking sour cream should be weighed out. This will remove excess liquid (whey). Line a large sieve with a towel, put sour cream in it, place the sieve on a plate and put it in the refrigerator for 3-4 hours. (This is how I prepare cheesecake cream without eggs, write if you are interested in the recipe). I have a sieve on legs, so it doesn’t come into contact with the liquid that comes out of it.

After 4 hours, I poured out half a glass of whey, the sour cream became thicker, you can clearly see it here.

Cherry filling
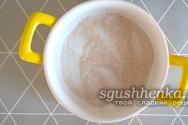
So that the berries do not have a very strong taste in the cake, we will prepare cherries in their own juice. This way our filling will be much more harmonious. Place the thawed cherries in a saucepan along with the juice, add a quarter glass of water and the same amount of sugar. It is necessary for the cherry to retain its sourness, then it will taste nice contrast of sweet and sour in the cake. Put the pan on the fire.

Dissolve the starch in the remaining quarter of the water. When the cherries boil, remove the pan from the heat and pour in the starch, stirring the contents of the pan. If you pour starch into a boiling and seething liquid, it may seize in lumps, and we do not want this.
Bring the cherries with starch to a boil and cook for a minute until thickened. Immediately remove the pan from the heat so that the berries do not lose their shape. As it cools the juice will become thicker and jelly-like. Leave until completely cooled.
Chocolate sponge cake
Prepare according to the instructions on the package. In a bowl, mix 2 eggs, sour cream and dry mixture.

Knead the dough, it turns out thick, there is a spoon in it. Place in a greased form.

Bake in preheated 180 degrees oven 35-40 minutes. We check readiness with a toothpick, since everyone’s oven is different. Upon completion, we get this nice cake, it has risen well, although not quite evenly

Glaze
Place all ingredients in a saucepan with a thick bottom. Place on low heat, and after all ingredients have dissolved, cook for 2-3 minutes, stirring constantly.

Girls, I’ll say right away - the glaze was not a success for me. The recipe was proven, but the oil let me down. The store didn’t have my favorite oil, so during cooking the oil phase separated and it turned out to be some kind of cuttlefish jelly. I tried to quickly correct the situation, but it was already late evening, so I made a glaze from half a glass of sugar, 3 tablespoons of water and cocoa - it turned out much better, but of course not as tasty as planned. If you have a proven glaze recipe, use it. In general, ideally, dissolve a good chocolate bar with cream
Sour cream
Place the weighed sour cream into a bowl and add 1 cup of powdered sugar. If you use sugar instead of powder, you will feel its crystals in the finished cream. Adjust the amount of powdered sugar to your taste, how much you like sweets - personally, it was just right for me. Beat with a mixer at medium speed to obtain a homogeneous creamy component.

Assembling the cake
Cut the biscuit in half and leave one half in the mold. You can see how nice it turned out! Looks no different from the usual biscuit

Cut the cut top into cubes. I couldn’t resist and stole a couple of cubes and tried. The sponge cake tastes wonderful - n tender, soft, chocolate- just melts in your mouth. It would be nice to eat it without any impregnation or filling at all.

Spread half of the cherry filling onto the crust, soaking it in syrup. Spread half of our sour cream filling evenly on top.

Place the biscuit cubes in random order. Drizzle the remaining cherry mixture on top. At this stage, you can use a spoon to compact everything well!

Grease the cake with the remaining sour cream. I got it right to the very top of the form.
Place in the freezer for 3-4 hours so that the side of the cake freezes well and the shape can be easily removed. In addition, chocolate the sponge cake will be more moist and tender after the freezer. Honestly, this was the first time I put the cake in the refrigerator and I was a little worried, but in vain. The form really easily separated and such a handsome man appeared to my eyes

I couldn’t help but pour glaze on it, since it’s not the cake on top, but sour cream, I was afraid that after defrosting the whole structure might float. But the cake holds its shape perfectly. In a good way, the sides also need to be glazed to create a kind of shell.
On a cold cake, the glaze sets very quickly, keep that in mind.

After frosting, I put the cake in the refrigerator overnight to defrost and soak.
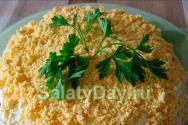
Well, here is the end result of my efforts. The inside of the cake was moist and soaked very well. And how incredibly delicious it is. And of course it’s very filling, don’t forget how much sour cream we put in there

The trick of this cake is that it turns out incredibly gentle. The combination of sweet chocolate and sour cherries has already become a classic, and sour cream with its delicate taste pleasantly complements and highlights this duet. In general, I really like sour cream cream, because it doesn’t give a particularly strong taste and doesn’t overwhelm the taste of cherries and chocolate.
I also really like that the cherries did not spread, but retained their shape. And their sourness suddenly reveals itself, and for some time dominates all tastes. And then delicate sour cream comes into play, which pleasantly envelops you, smoothing out all the bright notes
It’s generally difficult to understand from the taste that our biscuit is gluten-free, it doesn’t have any special taste and the consistency is familiar. It was well nourished, but did not soften, and retained its shape. If you don’t know, then it’s impossible to guess!
So feel free to buy this mixture and get creative. Based on it, you can make not only a cake, but also portioned cupcakes

Phew, dear girls, I hope you have mastered this. Making a cake is faster than writing about it. Even faster if you don't have to constantly take photos
This recipe will stay in my piggy bank for a long time, it’s one of my most successful desserts, despite some difficulties with the glaze. If the cake is well decorated, then it can feed a large group- it turns out to be very large and satisfying. And of course, it will please those who, for one reason or another, have gluten intolerance!
You can adopt this filling and cooking method and use it with a classic sponge cake
A gluten-free version of the Viennese Sachertorte. Suitable for those who do not eat gluten-containing foods.
The cake is delicious and filling, but it takes a lot of time to prepare. Preparation may take several days, because... You need to prepare biscuit cookies in advance in order to later make biscuit crumbs from them. Although there is a cake option where you can use crackers instead of sponge crumbs, in this case gluten-free ones, ready-made/store-bought gluten-free cookies or ground almonds.
I will describe the longest cooking option with biscuit crumbs.
Before cooking, I read a sufficient number of cooking options. I settled on the option proposed by culinary specialist Alexander Seleznev, although I made some changes to his recipe.
Ingredients for a small cake (shape - 18 cm). If you have a large mold (24-26 cm), then the amount of ingredients needs to be doubled.
For the crust:
Eggs – 4 pcs.;
Sugar – 100-120 gr.;
Rice flour – 80-90 gr.;
Biscuit crumbs (crackers) – 40 gr. + sprinkle the mold;
Butter – 80-90 gr.;
Cocoa without sugar – 30-40 g;
For impregnation:
Apricot jam – 6 tbsp.
For the glaze:
Heavy cream – 70-80 gr.;
Bitter/dark chocolate – 60-70 gr.
For biscuits:
Eggs – 3 pcs.;
Rice flour – 85 gr.;
Sugar – 50 gr. in yolks – 20 gr. into proteins;
A pinch of salt;
Lemon juice – 1 tbsp.
Preparing biscuits:
We will prepare more biscuits than needed, because... it turns out delicious too, surely someone from the family will come try it and eat half of it, so there will be just enough left over the cake. Therefore, after cooking, I recommend that you select the worst, crooked cookies and hide them in a cool, dry place. Hide about 60 grams. cookies.
1. Preheat the oven to 180-200 degrees.
2. Separate the whites from the yolks. Important: pour the whites into a completely dry whipping glass. Beat the yolks with sugar (50 g). Beat until white for at least 5 minutes. Continuing to beat, pour in lemon juice. Continuing to beat, 1 tsp. add rice flour.
3. Beat the whites with sugar (20 g), a pinch of salt and 3-4 drops of lemon juice. Beat for at least 5 minutes.
4. Add ¼ of the whites to the yolks and mix with a spatula or spoon from bottom to top. Then add another ¼ of the whites and mix gently from top to bottom again. So mix all the whites with the yolks.
5. Place the dough on a baking sheet lined with parchment using a pastry syringe or a spoon.
6. Bake in the oven for 30-40 minutes. The cookies should be crisp, crispy and easily separated from the parchment. It should be cream or light brown in color. You can additionally grill it.
7. Leave the cookies to dry for 1-2 days; no need to cover or put them in a box. Use a rolling pin to crush the cookies into crumbs; Roll the rolling pin over the cookies to crush the cookies.
Preparing the crust:
1. Turn on the oven and preheat to 200 degrees. Line a baking pan with parchment (baking paper) or grease it with butter and sprinkle with biscuit crumbs. If the mold is detachable, then the baking paper can be pressed into the mold and the excess can be cut off. Grease the bottom (on paper) and side with butter and sprinkle with biscuit crumbs.
2. Take the butter out in advance so that it warms up to room temperature and softens. Separate the whites from the yolks. Add yolks to butter. Place the whites in the refrigerator. Add 50 g to the yolks. sugar. Beat thoroughly until smooth and fluffy (beat for 5 minutes).
3. Add cocoa and beat thoroughly (2-3 minutes).
4. Add biscuit crumbs and flour. Beat thoroughly (2-3 minutes). The dough turns out very tight and thick.
5. Beat the whites with a pinch of salt into a stiff foam (beat for 5 minutes). Add sugar (50 g) and beat again into a tight, smooth foam (beat for 5 minutes).
6. Place 1/3 of the whites on the dough and mix as needed. The dough is quite tight, so mixing from bottom to top using the classical technology still won’t work. Place another 1/3 of the whites on the dough and gently mix from bottom to top. Add the remaining whites and fold gently from bottom to top.
7. Place the dough in the mold. Gently make a circular motion with the mold, the dough will be leveled in shape and will not rise into a pronounced dome during baking.
Bake for 40-50 minutes. Turn off the oven and leave the cake in it for 30-40 minutes. During this time, the cake will settle and move away a little from the mold. Do not open the oven during baking.
8. Cut the cooled cake in half lengthwise. I cut with a strong thread (fishing line). Wrap a thread around the middle of the cake and carefully pull the thread, it will cut the cake lengthwise. Thickly coat the lower part with apricot jam (4 tbsp). Cover with the top of the crust. Grease the top part of the cake with the remaining apricot jam. The rice flour dough is still a bit dry, so I grease the cake both in the middle and on top. Leave for several hours to soak.
9. Prepare the glaze. Pour cream into a saucepan and place over low heat. When the cream starts to heat up, add the broken chocolate. Stir constantly until the chocolate is completely dissolved. Remove from heat. Place half of the glaze on the cake and spread evenly over the entire surface. Spread the rest of the icing onto the sides of the cake. The most convenient way to do this is with a spatula.
Some recipes say that you need to put the cake in a well-heated oven so that the glaze melts and becomes smooth. This “trick” didn’t work out for me, I even turned on the grill.
Leave the cake for 6-8 hours in a cool place, maybe in the refrigerator. Traditionally, garnish with whipped cream before serving.
05/01/2017 06/01/2017
Chocolate Cake with Black Forest Cherries Gluten Free
A traditional dish of German cuisine, Black Forest cake is a popular and beloved cake by many. There are numerous variations of its preparation, the cake consists of moist and juicy chocolate sponge cake layers, layered with cherries and whipped cream. In the simplest, and yet very tasty version, these are sponge cakes with the addition of cocoa powder, soaked in one or another cherry alcohol, canned or boiled fresh cherries, or even cherry jam, and a cream contrasting in taste and color - most often whipped cream . The cake is usually decorated with cream, cherries and chocolate chips. My gluten-free version of Black Forest Cake may not be to everyone's taste. This cake is definitely not for children, with its distinct taste of dark chocolate and the presence of alcohol in the cream. However, the cake can be easily adapted to children's tastes by reducing the amount of cocoa in the biscuits and eliminating alcohol from the cream.

The presented cake will appeal to lovers of bitter rather than sugary sweet chocolate. The cake has a pronounced, intense bitter chocolate flavor in the cake layer, which is offset by the sweet and sour flavor in whole cherries boiled in low-sugar syrup. The taste of the individual cherry layer is sour-tart. To stabilize this layer in the cake, the cherries are placed on a thin layer of homemade apricot jam, and covered with a thin layer of vanilla buttercream, which is used in a thicker layer between the chocolate layers. The sides of the cake are processed with crumbs from the same biscuit, which are baked in specially left pieces to the state of crackers, which are then ground in a blender to a medium and fine crumb size. To decorate the cake, I used fresh cherries, which are in season right now, and instead of chocolate chips I used a new product - polished dark chocolate granules, which hold their shape perfectly and do not get soggy even on the surface of a soft cream with a high moisture content. The last serving photographs of the cake were taken on the 8th day after its preparation. The cake was stored in the refrigerator under a cover made of food foil.


Ingredients:
I wasn’t sure that I would have enough crumbs to cover the surfaces of the cake and therefore, just in case, I baked a 4th cake layer, lower but larger, so that its cut edges could be dried for crumbs, and if necessary, then use the entire cake layer for a crumb. As a result, I ended up with a full-fledged 4th cake layer, which, in my opinion, was unnecessary. The thickness of this cake (third from the bottom) differs little from the others, from which I can conclude that you can freely bake three cakes and use their trimmings for crackers processed into crumbs. You can avoid this by using chocolate chips for topping.
cakes
ingredients for one crust, bake 3 cakes, each cake is baked individually, make the cakes round (diameter from 19 to 21 cm, the height of the cake will depend on its size) or square at your discretion. You cannot bake 1 thick cake from this dough and cut it into 3 parts
- 1 large egg
- 100g applesauce or plain applesauce
- 50g sugar
- 20g pure cocoa powder
- 60g almond flour
- 3 g gluten-free baking powder (1/2 teaspoon)
When using raw cocoa powder, which is unheated, lighter in color and less bitter in taste, you can use either baking powder/baking powder or baking soda. When using regular, very dark cocoa powder, known as Dutch Cocoa, the dough will only rise when using baking powder. Baking soda will not work in dark, heat-treated cocoa powder. If you want to reduce the amount of cocoa in the recipe, use 15g of cocoa, and replace the remaining 5g of cocoa in the recipe with 10g of almond flour.
cherry
- 500g frozen cherries (sour cherries, I ordered an imported product from our greengrocer), you can use boiled cherries from canned Morello cherries, compote with a sugar content of no more than 12-14%, but not in thick syrup
- 200g sugar for frozen berries
- For 500g of canned Morello cherries, use 100ml of liquid from the compote and an additional 50g of sugar, in which to boil the cherries until the moisture has almost completely evaporated
- in the photo, cherries boiled from frozen berries

cream
As a cream, you can simply use whipped cream with a small amount of sugar, or any other cream at your discretion. The absence of dairy products in the cakes allows you to use dairy-free cream at your discretion, and the entire cake will comply with the requirements of the BGBK diet.
- prepare dough for 3 cakes individually
- bake each cake individually in a thin layer on greased baking paper, you can use a springform pan of any size, or simply on a flat baking sheet, where the dough is distributed in an even layer according to the size of the cake, making the cake slightly larger than the required size, for scraps of dough intended for subsequent drying
- To bake each cake, mix applesauce, sugar and egg in a bowl, beat well until light and volume increases 2-3 times.
- mix dry ingredients - almond flour, cocoa and baking powder
- add dry ingredient mixture to wet ingredients, stir
- pour the dough onto a greased sheet of baking paper, taking into account the size of the cake
- bake in an oven preheated to 165-170C with a fan for 25-30 minutes, the time depends on the size and shape of the cake, when ready it becomes dense to the touch
- Cool the cake completely, after cooling, turn it upside down, use a completely flat bottom surface to spread the cream
- The cakes have a stable structure, but are fragile to break; under no circumstances should they be bent
- All manipulations with the cakes are carried out using sheets of baking paper and cutting boards; when bending, the cakes will break

cake assembly
- prepare your workplace
- select in advance the surface on which you will assemble the cake and cover it with baking paper
- prepare a layer of berries, cream and selected material for decorating the cake (chocolate chips, crumbs, etc.)
- When baking free-sized cakes, cut the cooled cakes exactly to the size of the cake
- place the trimmings on a baking sheet and dry for about 15 minutes at a temperature of 150C, make sure that the trimmings are dry, let them cool, crush the cooled pieces into crumbs with a blender or rolling pin
- coat the surface of the first layer with a thin layer of apricot jam
- put a layer of berries on it


- Apply a small amount of cream to the cherry layer, completely filling all empty spaces between the berries

- place the second cake layer
- use significantly more cream between layers


- place a thick layer of cream on the top cake layer, coat the sides with cream


- Using a spatula, smooth the cream over the entire surface of the cake, including the sides.
- use crumb topping for sides of cake
- use chocolate chips on the surface of the entire cake or leave some of the frosting uncovered
- choose a place for the berries, I used the berries for decoration just before serving the cake
- my tall 4-layer cake was slightly tilted to one side, with the help of two spatulas I leveled it, and in order to eliminate the effect of “falling over” of a tall and narrow cake, for reliability, I transferred the cake to the base of a springform baking pan, and set the sides of the pan, leaving baking paper on the sides
- transferring the cake is very easy if the surfaces are on the same level, for example from the board to the base of the mold; baking paper is an invaluable friend in such manipulations
- store the cake in the refrigerator
- cake beautiful and easy to cut, leaving the cut smooth without squeezed out cream (for information, I will say that the cake was cut after it had been left for 5 hours at a temperature of 26C and high humidity), I was pleasantly surprised by the behavior of the cream


The cake is very soft in consistency and simply melts in your mouth. If I were to redo it, I would only leave 3 layers and use even more cream between layers. For me, as a person who is not at all indifferent and does not like dark chocolate, the ideal serving of the cake was with the addition of whipped cream without sugar. I was afraid that the cherry would be strong enough to not allow for a nice, even cut rather than breaking the cake at the base. But this did not happen, the cut turned out wonderful. And thanks to the whole cherries, the taste of the cake really benefited.

The photo shows the last piece of the cake, on the 8th day after it was prepared. Surprisingly, even when stored not hermetically sealed, but only covered with a dome of food foil, the cake did not dry out in the refrigerator during this period, and remained just as juicy and moist, but without phlegm. It's amazing that both the crumbs and chocolate granules didn't get soggy.

I was very pleased with the result in all respects, the cake turned out just as I had planned, very beautiful and festive, and we slowly enjoyed it until the New Year, or rather until January 1st. Once again I will say that this is not a cake for everyone, but for those who love chocolate and cakes with an intense and memorable taste, this cake is simply wonderful. And considering that the juicy sponge cakes are baked with apples and almonds, without flour or butter, and the cream, one might say, is simply dietary (for cream, I mean), this cake will withstand any criticism from the strictest judge as a pastry for the festive table.

Instructions
Children love sweets, especially chocolate cake. But I want it to be also useful. It would seem impossible to bake a delicious chocolate cake completely without gluten, flour and sugar, but thanks to pastry chef Inna Goldstein, I was convinced that this can happen.
Dates are added to the cake, which lower bad cholesterol levels and help strengthen the immune system. Cocoa contains magnesium, which stabilizes heart rate.
1.1. Dates and yolks
Dates should be boiled for about 5 minutes and then chopped in a blender.
Separate the whites from the yolks. Add 4.5 tablespoons of honey to the yolks.
1.2. Beat with a mixer
Beat the yolk mixture with a mixer until the mass increases in volume and lightens.

1.3. Mix the mass
Add cocoa and mix. Then add dates, chopped almonds, soda, baking powder and juice with the zest of 1 orange to the yolks with cocoa and mix.

1.4. Beating the whites
Beat the whites until white foam, add lemon juice and beat until fluffy and stiff peaks form.

1.5. Adding proteins
Take 1/3 of the whites and mix them into the dough with dates until smooth. Then transfer the dough completely into the whites and carefully and carefully mix slowly with a silicone spatula. If you mix the whites quickly, the cake will not rise.

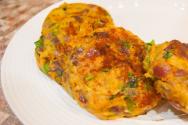
2.1. Let's bake
Transfer the dough into a cake pan (the pan should preferably be 18-20cm in size) and bake in a preheated oven at 180C for 40-45 minutes.

3.1. Preparing syrup
While the cake is baking, make a syrup from the juice of one orange and 3.5 tablespoons of honey (honey with orange juice should be brought to a boil and then kept on fire for about 3-5 minutes).

3.2. Preparing the glaze
To make chocolate glaze, you need to heat the cream over medium heat, reduce the gas to the lowest setting, add chocolate (black or milk), when the chocolate has dissolved, add the butter cut into cubes and leave on the fire for another 3 minutes, stirring.