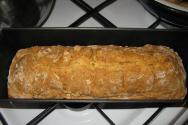
How to cook jellied meat. Kholodniki: recipes and cooking secrets How to choose meat for jellied meat
If they ask me what dish is certainly prepared in Rus' for the biggest and greatest holidays, then I will answer without hesitation - of course, jellied meat. And not only in Rus', it is being prepared in Ukraine, and in Belarus, and among many other Slavic peoples.
This dish has different names; in addition to the main dish, it is also called aspic or jelly. The names are different, but the dish is essentially the same. It’s not difficult to prepare, but what’s interesting is that if you give each housewife the same standard set of products, then each of them will still get their own dish, unlike any other! No two dishes are the same!
This delicious dish is prepared as an appetizer for weddings, Christmas, Epiphany, and of course, the New Year would be absolutely unthinkable without it! This big and fun holiday is coming soon. And for those who don’t know how to cook it yet, now is the time to learn!
One of my friends says that if there is no jellied meat on the New Year's table, then there is no need to celebrate the holiday! And he always cooks it very tasty! He believes that it’s simply impossible to imagine a better snack to go with vodka!
There are quite a lot of recipes for this amazing meat dish; it is prepared from pork, beef, chicken, and even fish. But it turns out the most delicious from different types of meat. This is the so-called holiday option. This is where we will begin our selection of recipes today.
And in the process of telling the story, I will share the main secrets that allow you to prepare the most delicious jelly you can imagine, with a capital J!
The holiday dish is usually prepared from pork, beef and chicken. It is believed that the more meat of different types, the richer and more intense the taste.
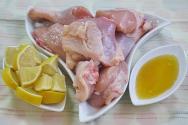
Sometimes they ask, “Why add chicken? Surely you can just cook it with chicken then?” Of course you can! But if we are preparing a festive version of the dish, then chicken meat will make it softer and more tender. And of course, more delicious!
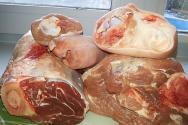
When choosing meat, you need to choose one with a lot of bones - these are the so-called gelatinous parts. If the meat is chosen correctly, you will not have to add gelatin to thicken it. It is believed that this dish does not require its addition. And if cooked correctly, it will harden on its own without any gelatin.
We will need:
- beef shank – 1 kg
- pork knuckle - 1.3 kg
- pork leg - 1 pc. — 400 gr
- chicken legs - 1-2 pcs
- carrots - 2 pcs.
- celery root - 0.5 pcs, celery root
- onion - 3-4 (small heads)
- bay leaf - 3-4 pcs
- black peppercorns - 20 pcs
- ground black pepper, salt - to taste
- boiled egg - 1-2 for decoration
Preparation:
1. Before you start cooking meat, you need to prepare it. Examine it from all sides, and if there are bristles or hairs left on it, they need to be set on fire. Then scrape off the darkened part with a knife, and then rinse the meat in cool water.

Sometimes when buying legs you may notice that they are dark and ugly. They were scorched with stubble and were not cleaned. It is better to refrain from buying such legs. When cooking such meat, the broth will turn out dark and unattractive, and may also have the smell of burnt bristles.
Well, if you still didn’t look at it and bought it, then you need to carefully scrape it off with a knife and rinse it in plenty of water. Yes, and soak it in water for 3 hours.
2. When the meat has been cleaned and washed, it should be placed in a basin or large pan. And fill with water at room temperature for at least 3 hours. During this time, unnecessary blood will be released into the water, and the water will turn pink. And the unnecessary smell will go away.

When the meat begins to cook, less foam will appear.
3. After the allotted time, remove the meat and transfer it to a pre-prepared pan. It should be large enough, since the meat that we cooked, plus a large volume of water, will not fit in the pan.
4. Fill with water. So that it only covers the meat. Place on high heat. And until it boils, we don’t leave the kitchen. This is an important point. While the meat is boiling, remove any foam that appears. There won't be much of it, and that's good. Almost all the blood has already come out during the initial soaking.
5. As soon as the water boils, immediately reduce the heat and simmer until gently bubbling for exactly 5 minutes. Then remove the meat with a slotted spoon and drain the water. Wash the dishes in which it was cooked, rinse the meat, and again add the required amount of water.
Typically, water for cooking is poured at the rate of 1.4 -1.5 liters of water per 1 kg of meat. This is provided that we will not add more water during the entire cooking process. And it is advisable to fulfill this condition!
6. Now you need to bring the water in the pan to a boil again. And again, it is advisable not to leave the kitchen. Also remove the foam slowly and wait until the water boils. This will happen much faster than the first time. The meat is already warmed up from the inside.

7. As soon as the water boils, immediately reduce the heat to low.
If you skip this moment and let the water boil vigorously for even 5-10 minutes, the broth will not be clear. It will either turn white or cloudy.
And we need a transparent, beautiful broth so that all the pieces of meat are clearly visible when pouring!
8. That’s it, turn down the heat, cover it with a lid so that steam is sure to escape, and you can forget about it for 4, or even 5 hours. From time to time, of course, you can check to see if the water has boiled away. But if you do not forget about a small fire, the broth will gurgle quietly, and the meat will cook. But the water is not going anywhere.
If the broth does not gurgle at all and does not boil slightly, then the meat will not cook. Keep an eye on this!
9. In this way, the meat will cook for at least 6 hours, and sometimes it takes a little longer. Its readiness is determined by the fact that the meat must completely move away from the bone.
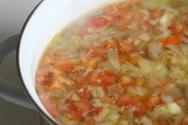
10. An hour and a half before readiness, you need to add whole peeled carrots and celery root. I have it a little larger than a tennis ball, so I took half of it. You also need to add onions. I have small heads, and I put 4 of them, and I didn’t peel one, the largest one, but just removed the top “shirt” and put it along with the husk.

Such an onion must be washed especially thoroughly, and make sure that there is no mold or dirt under the layer of husk.
Vegetables will give the broth the necessary aroma and color, which is important. Onions and carrots will give a golden hue, and celery root will give a subtle subtle aroma.
11. Now, you can add a little salt to the broth, but not until cooked, but only so that the meat is saturated with flavor. If you add salt right away, the water will boil away and the broth may become oversalted.
12. An hour before it’s ready, add peppercorns to the broth. And cook again.
If the onion starts to boil, it's okay. Don't remove it from the broth ahead of time, we will find a way to remove it later.
13. After six hours of cooking, check whether all the meat comes off the bone and whether the broth is ready. You can check this by carefully dipping your thumb and forefinger into the broth. Then, when it cools down a little, connect them together and try to separate them. The fingers should become sticky and stick together.
In general, the meat for the dish is cooked for 6 to 8 hours. In any case, look at the condition of the meat. Let me remind you once again that the meat should easily come away from the bone.
14. Salt the broth until cooked, add ground black pepper to taste and add bay leaf. Cook for another 10 minutes.
15. Remove the vegetables with a slotted spoon, carefully remove the carrots; we will need them later. We will throw out the onion and celery root, so we will get it as soon as we can get it.
16. Remove the meat and bones with a slotted spoon into a large bowl. And wait for them to cool slightly. We will disassemble them with our hands, so we need to wait for a comfortable temperature so that our fingers can tolerate them.
17. While the meat is cooling, line a colander with three or four layers of gauze and strain all the broth through it. Small bones and onion remains will remain on the gauze.

18. Determine in advance how you want the dish to appear on your table. It is served either in small portioned salad bowls or in one large container, a special tray. It is advisable that this container have a lid. Since the dish will sit in the refrigerator overnight, you will need to cover it so that it does not absorb unnecessary odors.

19. Another important point that I almost forgot about. Some people like to eat fattier foods, and some people cannot tolerate them at all. In our family, we fall right in the middle. My husband likes it when there is a small layer of fat, but I can’t eat fat at all.
Therefore, during cooking, I partially remove it. If you don’t like fat, you can remove all of it.
And then, when you pour the broth into a tray or mold and cool, all the fat will rise to the top. And then, when you eat, you can easily remove it with a knife, which is what I do. And so it turns out that no one is offended, everyone eats what they like best!
20. And so, the meat has cooled down and we will now disassemble it. It can be disassembled easily and simply, but your fingers will get dirty. Take one flat plate and two deeper bowls. On a plate, use a knife to remove the meat from the bones and immediately separate it into fibers.

Place the bones in one bowl, and the removed and divided meat into another. Everything comes off easily and quickly. Therefore, this will not take much time.
21. Cut the carrots into curly stars. Peel the eggs and cut into slices. You can put them on the bottom if you subsequently turn the mold over. Or place the chopped pieces on top if you serve the dish in a mold.

22. Pour in the slightly cooled broth by then. You can pour in two different ways -
- Pour the broth into the meat and stir the contents. In this case, the meat and broth will seem to be together. In this case, mix first, and only then add carrots and eggs.
- Place the meat in the first layer, then pour in the broth. In this case, you will get two separated layers. The first is meat, and the second is in the form of jelly.
23. In both cases, wait until the dish has cooled completely. And only after that put it in the refrigerator. It will take 3-4 hours for complete hardening. But I usually leave it overnight.
Well, if you are preparing it for the New Year, then it is very convenient to make it in advance, on December 30th. The dish will be perfectly stored until 31, unless, of course, no one eats it ahead of time. The temptation is too great.

In such cases, I usually prepare extra portions, which we eat on the morning of December 31st for breakfast. And then, until the evening, no one else rushes to cut off a piece from the festive piece!
24. As mentioned above, we serve the finished dish either in a large common tray or in special trays. Or we turn it over onto a plate and serve it in all its glory.
True, this is not entirely easy to do. You can't just pick it up and turn it over. But there is a way. Run a sharp knife along the edge that separates the frozen meat from the wall. Boil water in advance and pour it into a large container that fits the tray. And lower the tray into the water for 30 seconds. Then place a dish on top of which you will turn it over. And carefully turn it over.
If the contents become capricious and do not want to be pulled out, lightly pry it up with a silicone spatula. The most important thing is to give it inertia. And there he himself, under the influence of his gravity, will sit on the dish offered to him.
25. The dish is served with horseradish or mustard, of course. Sometimes crushed garlic is added to mustard. And to hell with freshly squeezed lemon juice.

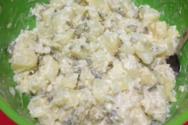
It should be noted that this is the so-called chopped jellied meat, but someone makes it ground. To do this, the meat that has been taken from the bones is twisted in a meat grinder. Garlic can be added if desired. And only then all this is mixed with the broth and laid out on trays.
But I don't really like it ground. I like it when the meat fibers are visible through the clear broth, and the meat feels like whole pieces while eating. But here, of course, it’s a matter of taste!

And of course you need to say a few words of praise for such jellied meat. However, to determine its characteristics, you can get by with just one thing - MIRACLE!
Miracle, how good! Tender, rich, piquant, delicious, aromatic, simply amazing - these are just a few simple words to try to describe its taste.
It’s not for nothing that our friend respects and appreciates him so much, and doesn’t sit down to the festive table without this meat snack.
All subsequent recipes are prepared according to the same scheme as the first option. The difference is only in the composition of the ingredients. Therefore, if you want to prepare a dish according to the following recipes, then read the first one - because it describes all the cooking secrets!
Delicious homemade beef recipe
This dish can also be prepared for a holiday, and it’s also good on weekdays! What is called “cooking for both the feast and the world.” Some people prefer to cook it as in the previous version, while others do not want to use pork. And then you can prepare a dish from just beef.
We will need:
- beef shank - 1.5 kg
- beef ribs – 1 kg
- beef neck (pulp) - 1 kg
- onions - 3-4 pcs.
- carrots - 2 pcs.
- celery root
- pepper3 black peas - 20 pcs
- bay leaf - 3 pcs
Preparation:
1. Rinse the meat and soak in water for 3 hours. Then drain the water.
2. Place the meat in a large saucepan and fill it with water so that the water just covers all the meat.
3. Let it boil, skimming off the foam. After 5 minutes of boiling, drain the water. And add fresh water at the rate of 1.4-1.5 liters of water per 1 kg of meat.
4. Wait until it boils, constantly skimming off the foam. After boiling, reduce heat to low and cook for 4-5 hours.
5. Salt, add whole carrots, half a celery root and onion. Leave one onion in its peel.
6. When 6 hours have passed, check whether the meat comes away from the bone. It should come off very easily. If not, then cook a little more. Allowable cooking time is up to 8 hours.
7. 10-15 minutes before the end of cooking, add ground black pepper and bay leaf to the broth.
8. Then remove the meat from the broth and disassemble it into fibers.

9. Strain the broth through 3-4 layers of gauze.

10. Place the meat in a tray and pour in the broth.
11. Cool at room temperature and refrigerate overnight to set.

As you can see, the recipe is exactly the same as in the first version. We serve it the same way as described above.
Another recipe according to which we, for example, always prepare an everyday dish - with pork legs.
Jelly from pork or pork feet
As you already understood, in this version we use only pork meat. Often I cook jelly only from pork legs. Of course, there is not as much meat in it as when you cook it with a shank, or with the addition of a piece of pork. But we really like this “Spartan” option!
We will need:
- pork legs - 4 pcs
- carrots - 1 pc.
- celery root - optional
- onion - 2 pcs
- peppercorns - 20 pcs
- bay leaf - 2-3 pcs
- salt, pepper - to taste

Or another option:
- pork knuckle -1.5 kg
- pork legs - 1 - 2 pcs
- pork neck - 500 gr
- carrots - 1 pc.
- celery root - optional
- onion - 2 pcs
- peppercorns - 20 pcs
- bay leaf - 2-3 pcs
- salt, pepper - to taste
Preparation:
I will not describe the entire cooking process, because I won’t tell you anything new. I have already told you everything about the secrets and cooking technology in the first recipe. Therefore, we cook and cook according to the same scheme.
The only thing I will focus on is cleaning the legs. The legs are not always sold clean and white. Sometimes the bristles need to be removed and then cleaned. Most likely, everyone knows how to remove bristles, or they don’t know, but they have seen it. But still I will remind you.
I light the gas and hold the leg directly over the fire in the place where the bristles remain. The smell is certainly not pleasant, but you have to be patient. Then scrape off any scorch marks that appear with a knife and then rinse with water. You also need to remove or clean the hooves very well. They are usually very dark in color and just beg to be removed altogether.
If the legs themselves are also dark, then they also need to be thoroughly scraped with a knife and then rinsed with water. And don’t forget to soak them in water for 3 hours.
Otherwise, the dish is prepared exactly the same as in the first recipe. There are no changes in the recipe, all the principles and steps are the same!
The finished jelly can be served in a tray, or you can turn it over and place it on a dish.

It turns out quite beautiful! And how delicious it is, you can’t even describe it in words!
"Pig" in a bottle
On holidays, very often familiar and everyday dishes are prepared in some interesting form. And one of these forms is “Piglet” jelly, which is poured into a plastic bottle.
Such a presentation invariably causes delight among all guests. The pig on the festive table looks very positive. I think that such a dish could well decorate any New Year's table.
We will need:
- pork knuckle - 1 piece
- chicken legs - 2 pcs
- carrots - 1 pc.
- onion - 1 pc.
- celery root -0.5 pcs
- bay leaf - 2 pcs
- peppercorns - 7-10 pcs.
- salt, ground black pepper - to taste
For registration:
- ham or boiled sausage
- cloves - 4 pcs.

Preparation:
1. Wash the meat and soak in water for 3 hours. The legs do not need to be filled with water. Then drain the water.
2. Place the meat and legs in a saucepan and fill it with water until it just covers the top. Bring to a boil, skimming off the foam.
3. Drain the water and refill with fresh water. Bring to a boil and cook for 5 hours.
4. Add peeled whole carrots and celery root. Remove the outer jacket from the onion, wash it and put it in a saucepan along with the vegetables. Season with some salt and add peppercorns.
5. After another hour, check whether the meat comes off the bone well; we are primarily interested in the knuckle. If the meat comes off easily, add bay leaf, pepper to taste and taste the salt. Cook for another 20 minutes.
If the meat does not come out well, cook it until it reaches the desired state.
6. Remove the meat from the broth, cool slightly and separate the bones. Then we divide it into fibers or cut it into cubes.

7. Strain the broth through several layers of gauze.
8. For the “piggy” you can take 0.5 - 1 -1.5 liter plastic bottles. It all depends on the size you want to get.
9. Place the meat in the bottle, then pour in the warm broth. Shake the contents, let cool and place in the refrigerator until completely solidified, at least 3 hours, and preferably overnight.
10. Before serving, carefully cut the bottle on both sides with a sharp knife or scissors. Place the jelly on a dish.
11. Make ears and snouts from ham or boiled sausage. Make cuts on the top of the head and insert ears into them. Attach the patch with a toothpick. Make eyes and nostrils from cloves.
12. Serve with horseradish or mustard.
Such a “Piglet” will certainly be greeted with “Hurray!” So take note of the recipe. I think that you will definitely find it useful!
The meat for “Piglet” can also be cooked in a slow cooker. The same goes for any other recipe.
How to cook jellied meat in a slow cooker
We will need:
- pork legs - 2 pcs.
- chicken legs - 2 pcs
- onion - 1 pc.
- carrots - 1 pc.
- garlic - 0.5 heads
- salt, peppercorns
- water - 2.5 liters
Preparation:
1. Cut the chicken legs into pieces at the joints.
2. Clean the legs, wash and soak for 3 hours.
3. Place meat, peeled onions and carrots in a multicooker bowl. Add salt, pepper and water.
4. Set the “Extinguishing” mode and simmer for 6 hours. Check if the meat comes away from the bone, then you can turn off the multicooker. If not, you can wait another hour.

5. Remove the meat, remove the bones and separate into fibers.
6. Crush the garlic with a knife and add to the broth. Let stand for 15-20 minutes. Then remove the garlic. Taste to see if there is enough salt and pepper.
7. Place the meat in a tray or molds and pour in the strained broth.
8. Leave at room temperature until completely cooled, then put in the refrigerator for 3-4 hours or overnight.
9. Serve in portions or place the tray on the table.

These are the main types of meat dishes. It is also prepared from chicken. But we will not touch on this topic today. And if you are interested in a similar question, then you can ask where such dishes are prepared.
Cooking secrets
And now I propose to dwell once again on the most basic stages of preparation, thanks to which your dish will always be delicious. And such surprises will never happen to it, such as unfrozen jelly, overcooked or undercooked meat, or overly salty, or hard and not at all aromatic broth.
After all, they used to specifically check whether the housewife knew how to cook jellied meat, and if she couldn’t do it, then they put her in the category of incompetent. What can I say, and among my friends there are those who do not succeed in this dish at all. But I advise you not to give up, but rather read everything carefully and follow step by step. prepare a dish that will make everyone gasp!
- The first thing you need to do is buy the “right” meat. Good jelly is made from gelatinous parts, that is, the meat should have bones. Legs, shanks, shanks, ears, tails, heads - just what you need! No matter how much you would like it, you don’t need to add a lot of pulp. As a last resort, if you are in doubt about the choice of meat, ask the seller in the meat department to tell you which meat to choose.
- remember that veins, cartilage, skin, skin contribute to the solidification of the broth
- the most delicious dish comes from different types of meat
- be sure to add a chicken leg or two. It will be much tastier this way
- Before cooking, meat must be soaked in cool water for 3 hours
- the first water must be drained 5 minutes after boiling
- Bring the second water to a boil, being sure to remove the foam, and then reduce the gas to a minimum. The meat should only gurgle slightly, but under no circumstances boil. Otherwise the broth will turn out dark and opaque.
- We take water in the ratio per 1 kg of meat - 1.4 -1.5 liters
- We try not to add water during the cooking process. But if that doesn’t work, then at least add boiling water.
- Sometimes the broth is clarified using egg white, but if you cook it correctly, you won’t need this procedure.
- cook the meat for at least 6, but no more than 8 hours. Until the meat comes away from the bone freely
- adding vegetables during cooking is a must! Thanks to them, the broth acquires a beautiful color and aroma.
- add the onion in its peel, it will give a beautiful golden color
- adding spices is a must, otherwise the dish will turn out “bland”
- salt twice, the first time a little after 4 hours, and the second time at the end of cooking, already tasting the broth
- after placing the meat in a mold and pouring broth over it, you need to let it cool at room temperature
- after which it needs to be cooled. Sometimes they think that you can keep jellied meat on a balcony or street with sub-zero temperatures, that it will freeze better this way. If it freezes, it may be better, but it will completely lose all its taste, aroma, delicate texture and softness.

- The dish should be served with horseradish or mustard. Whoever wants to use it, whoever doesn’t want to, will refuse. But these additional components must be supplied to it!
I hope that with today’s selection of recipes, you can easily prepare truly delicious jellied meat. I also hope that the article and cooking tips will be useful to you.
And if you want to look at other recipes, there are such recipes. And you can see them in the special article “How to cook jellied meat” http://kopilpremudrosti.ru/
After all, the New Year is very close! And what would New Year be without a real traditional Russian dish! Therefore, we have no need to break traditions - we will definitely prepare it!
After all, this dish turns out to be truly beautiful and festive, and we can’t even talk about the taste. Everyone already knows him very well!
Bon appetit!
New Year is approaching! The old one will end, we will spend it as it should be, and we will meet the new one as it happens. Traditionally, we will set a rich table with various delicious dishes and equally delicious drinks.
Traditionally... What is traditional with us, then? A?
As a good friend of mine says, the appetizers on the table on New Year's Eve should be Olivier and jellied meat. And everything else is self-indulgence and an inappropriate tribute to someone else’s fashion.
To be honest, I don’t remember celebrating New Year and Christmas without jellied meat. This is blasphemy or something.
In our country, jellied meat is called “cold”, rarely “jelly”. In Russia, especially in the western regions, in the Urals - “jelly”. Or simply " ". I spent a long time trying to understand the difference between jelly and jellied meat. They say it's one and the same. Maybe. But our jellied meat is made from suckling pig. Or from pork legs, drumsticks. It is rare to add beef hooves or shanks. And, judging by the collections of recipes, jelly is usually made from beef: hooves, shanks, head.
The eternal question when cooking jellied meat is “will it harden or not,” since adding gelatin is a sign of bad taste.
Jokes aside, it always freezes. Even if there is no beef component. And how can jellied pork legs not freeze if a spoon is floating calmly in the boiling brew?
The process of preparing high-quality jellied meat is very labor-intensive and time-consuming, especially if it is jellied meat made from pork feet. How to cook jellied meat? I will answer - for a long time.
Recipe for excellent jellied meat
Ingredients (6-8 plates)
- Pork feet 2 pcs
- Pork shin 1 piece
- Beef 1-1.2 kg
- Carrot 1 piece
- Parsley root 1 piece
- Onion 1 piece
- Garlic 1 head
- Black peppercorns, allspice, bay leaf, salt taste
- Considering that the family loves a lot of meat in jellied meat, pork jellied meat is not particularly welcome at home. You have to add veal.
- We have never added chicken or poultry in general to jellied meat.
- Historically, in our country, transparent jellied meat is not considered particularly honorable.
- It is better to buy meat at the market. There it was guaranteed not to freeze.
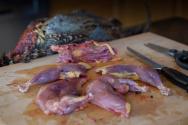
Pork feet, drumsticks and beef
- Thoroughly clean the legs and shins of bristles, and if necessary, oil them over an open fire. Clean and rinse.
- Using a knife, cut the pork legs in half lengthwise, and again in half at the joint. You shouldn't chop it with an ax; there will be a lot of small bones.
- Cut the drumstick into several parts; the large central bone can be left whole without chopping.
- Cut the brisket into several parts.
- Strictly speaking, the size of the pieces of meat for jellied meat is not important.
- All meat must be washed and soaked in cold water for at least 2-3 hours, or better left overnight in a cold place. The second option is preferable, because jellied meat takes a long time to prepare, and it is better to start in the morning.
All meat must be cut, washed and soaked in cold water.
- In the morning, rinse the meat again, put it in a saucepan or cauldron, and cover with cold water. The water should be 5-7 cm above the meat level.
- Place the pan on the fire and bring to a boil.
Place the pan on the fire and bring to a boil
- It is important not to miss the boiling point. There will be a lot of foam. It needs to be removed. Use a spoon to collect all the foam that continuously forms. After 5-10 minutes, foaming will stop completely. From this point on, cover the pan with a lid and reduce the heat to low. The liquid in the pan should not even boil, but “move” a little. Do not allow it to boil violently under any circumstances. Just a low simmer.
- Leave the meat to simmer for 4-5 hours. However, you can stir it sometimes. Do not add water to the pan!!! Even if it partially boils away.
Cook the jellied meat for a long time on low heat
- After 4-5 hours, add black and allspice peas, bay leaf, 1 tsp. rock salt and washed unpeeled onions, carrots, parsley and celery roots.
Vegetables for broth and garlic
- If the liquid has boiled away too much, you will have to add boiling water from the kettle. Although this is not good, liquid is needed.
Add onion, roots and spices
- Cover the pan with a lid and cook at low boil for another 1-1.5 hours.
Cooked broth for jellied meat - cooling
- Remove the pan from the heat. Using a slotted spoon, remove all the meat. Place the meat on plates and let cool. Throw away onions, carrots, roots, although carrots can be left for decoration.
Using a slotted spoon, remove all the meat
- A small digression. Many people prefer jellied meat that is completely transparent. To do this, the broth must be clarified. How? Look for yourself, they say that egg whites work well. I won’t say that my result turned out to be transparent like glass, let’s say it’s the transparency of amber. And without lightening.
- Season the broth with salt to taste and a little more. It should seem a little salty, literally just a little. Season with ground black pepper and add chopped garlic to a paste. Stir the broth, cover the pan with a lid and leave for 20-30 minutes
- Next, you need to strain the broth. It is better to do this through a naturally clean cloth. The cloth will filter out small seeds, peppercorns, garlic, and bay leaves. All this is superfluous in jellied meat. Leave the broth to cool. After 10-15 minutes, remove excess fat from the surface of the broth. You can simply collect it with a spoon.
It is necessary to remove fat from the surface of the broth
- Or maybe a napkin. An ordinary paper napkin thrown onto the surface of the broth becomes covered with a film of fat, is removed and discarded. If you repeat this several times, you can almost completely clean the surface of the fat film. Oh, by the way, leave a little fat, then the surface of the finished jellied meat will have “frost.”
- You can do a test that will answer the question “will it harden or not.” Place a drop of broth on your index finger and thumb and make sure your fingers stick together well. If they don’t stick together, it means you made the jellied meat from bouillon cubes.
- Handle the cooled meat, separating and discarding all the bones. This is important, since a bone can easily break a tooth. The meat can be cut into small pieces, divided into fibers, or used as is, in pieces.
- Prepare several deep plates or molds for jellied meat. It is very convenient to use large enameled rectangular containers, like a trough, or deep soup plates.
- At the bottom of each plate you can put parsley, a piece of hard-boiled egg, and carrots removed from the broth.
Place meat in ramekins
- Place meat on a plate. Much better and tastier.
- Pour in the cooled broth until the meat is completely or almost completely covered with broth.

![]()
![]()
![]()
we will need: 1/4 cup of baking soda
1/4 cup cornstarch (or potato starch)
1/4 cup water
Mix everything in a Teflon coated frying pan.
![]()
put on the fire, stirring constantly, literally after a minute the soda will hiss and lumps will begin to form
![]()
We continue to stir, after a couple of minutes a lump will form that easily moves away from the walls
![]()
transfer to a towel, be careful it is hot
![]()
and knead like regular dough. the dough does not stick to your hands, and does not require the use of oil or any creams, the lump is small
![]()
painted with acrylic paint and lipstick. Store CP in a plastic bag, tightly closed.
![]()
I stuck these roses on, they don’t crack!!!
![]()
I tried this recipe for the first time last year. But I made it with potato starch, the color turned out greyish. I have had this flower for a year now, this is one of the first attempts at modeling, a flower of an unknown breed and primitive, I transfer it from box to box, there is no use for it yet
![]()
![]()
I tried to cook HF twice according to classic recipes, but it was unsuccessful. But I still hope that someday I’ll get lucky and it will work out, but for now I’m content with this. Thanks to everyone who came to visit, everyone is very welcome. Do you like watch-shaped mobile phones? If you want to buy a chasofon in Ukraine, I invite you to visit the website of the online store Chasofon.com.ua. Here you will find a large selection of this ingenious innovation that combines a chronometer and a communication device. The new generation models are factory-produced, they are branded and reliable, they are an amazing choice at a minimal cost and a guarantee of performance. I wish you a successful stylish shopping!
![]()
![]()
![]()
we will need: 1/4 cup of baking soda
1/4 cup cornstarch (or potato starch)
1/4 cup water
Mix everything in a Teflon coated frying pan.
![]()
put on the fire, stirring constantly, literally after a minute the soda will hiss and lumps will begin to form
![]()
We continue to stir, after a couple of minutes a lump will form that easily moves away from the walls
![]()
transfer to a towel, be careful it is hot
![]()
and knead like regular dough. the dough does not stick to your hands, and does not require the use of oil or any creams, the lump is small
![]()
painted with acrylic paint and lipstick. Store CP in a plastic bag, tightly closed.
![]()
I stuck these roses on, they don’t crack!!!
![]()
![]()
I tried this recipe for the first time last year. But I made it with potato starch, the color turned out greyish. I have had this flower for a year now, this is one of the first attempts at modeling, a flower of an unknown breed and primitive, I transfer it from box to box, there is no use for it yet
![]()
![]()
I tried to cook HF twice according to classic recipes, but it was unsuccessful. But I still hope that someday I’ll get lucky and it will work out, but for now I’m content with this. Thanks to everyone who came to visit, I’m very glad to see everyone
Do you like watch-shaped mobile phones? If you want to buy a chasofon in Ukraine, I invite you to visit the website of the online store Chasofon.com.ua. Here you will find a large selection of this ingenious innovation that combines a chronometer and a communication device. The new generation models are factory-produced, they are branded and reliable, they are an amazing choice at a minimal cost and a guarantee of performance. I wish you a successful stylish shopping!
In this master class I will tell you in detail how I make my cold porcelain. This master class will be of interest not only to those who want to make their first flower, but do not dare to make cold porcelain themselves, but also to those who have been sculpting for a long time and professionally, because as a result of the usual recipe I have modified, the clay obtained is almost like Thai modern or fleur (a comparison will be given below).
In the title photo you can see what we need for this (exactly this). The main thing in this set is, of course, glue. It must be with a plasticizer, otherwise nothing will work. Initially, I made clay from the same glue, only in a red jar with D2 plasticizer, but the clay turned out to be viscous, dried quickly, and did not roll out well. I decided to change the glue to this one in a white jar, it has a D1 plasticizer.
This glue is sold in construction stores such as Megastroy, Leroy Merlin. Trust me, it's worth looking...
Regarding starch: I haven’t tried using potato starch, I don’t know, corn starch is better, as it gives whiteness and velvety.
Regarding the cream: I haven’t found a better one than Nivea cream in a blue jar. It contains everything for good clay: Vaseline oil, wax, paraffin, glycerin (use only this).
Regarding Jonsos oil: if you don’t have it, you can replace it with petroleum jelly (sold at the pharmacy), but Jonsos also contains coconut oil, it is a softener, gives the mass tenderness, softness, velvety - almost like baby’s bottoms :)
I haven’t tried using lemon juice instead of citric acid; it seems to me that liquid is not needed here.
Let's begin! I will write in great detail so that you don’t make my mistakes and everything works out for you.
1. Pour 100 ml of glue into the first glass.
2. Pour the same amount of starch into the second glass (hit the glass on the table so that it settles and, if necessary, add more starch so that there is an even amount). Then take a teaspoon and add 3 more small heaped spoons. It should look like this:

3. It is also important what you cook the mass in. You need a container with a thick bottom and a good non-stick coating so that the mass gradually warms up. I once cooked it in a thin frying pan with a glossy non-stick coating (it didn’t work), the only time I threw it in a bucket. Another point: there should be no dust or lint on the frying pan and spatula, so wipe with a damp cloth and then with a waffle towel or paper napkin, otherwise it will all be in your snow-white porcelain.
4. Pour glue into the frying pan, then Nivea cream, oil, citric acid. Proportions in the picture.

You need a full teaspoon of oil (a little spilled out when I took the photo).
5. We put the frying pan on low heat and at this moment we don’t go anywhere and don’t get distracted. Using a wooden spatula, mix vigorously and smoothly until the cream is completely dissolved.

6. When the pan becomes warm, but not hot, the first bubbles appear, then pour in half a glass of starch and stir vigorously, then the second part and stir without stopping.


7. You need to stir in a circular motion, as if collecting the mass into a lump. An important point: when to remove from the pan? You can either undercook or overcook. I do this: when a lump has formed, as in the last photo, I press it against the frying pan with a spatula and lift it; if it falls freely, remove it immediately; if it sticks, it’s too early.
8. Prepare a clean, smooth surface for kneading in advance. Sprinkle a little starch and lay out the lump. Let it cool down.

At this time, wash the frying pan and everything that was with glue. The glue can be quickly washed off with a simple detergent and hot water. After this, wipe your hands with a damp cloth and a dry waffle towel (otherwise everything will remain in porcelain), powder your hands with starch and begin to intensively knead the mass. The mass should be warm, not hot, otherwise there will be a paste. I don’t knead on the board, but do it in my hands - I knead it like plasticine, stretch it, crush it, and so on. If it sticks to your hands, lightly powder the mixture and continue for 5 minutes. The mass should turn out to be plastic (not torn), soft, velvety, snow-white.

We wrap it in a plastic bag, letting out the air, and put it in any opaque container away from the battery. By the way, I don’t lubricate the bag with cream, since the mass does not stick (the cream gives the mass shine and plasticity). Stores perfectly. After a month it does not lose its properties. Let's compare purchased clay and mine.

Let's compare plasticity, transparency, color.

Personally, my conclusions and feelings:
Cold porcelain is no worse than store-bought Thai clay - it is just as soft, flexible, even more velvety and whiter, takes paint well, does not shrink, and tolerates moisture well.
But there is one But: after 10-12 hours of hardening, you can correct the shape of the product, but after two days this is no longer possible.
What do the Thais add to their clay to maintain plasticity? Maybe someone knows?
I present my work, made entirely from porcelain of my own production.

This concludes my first master class in my life, so, my dears, do not judge me harshly, please.
Ask questions, I will answer everyone with great desire!
I wish everyone inspiration, more free time for creativity, smiles and good mood!
Report to moderator