We have been sculpting from dough for 8 years. Salt dough modeling for small children. The benefits of modeling dough for children
I have already written several times about how important a baby is. Yes, I think you know this very well even without me. Therefore, today, without further ado, I want to talk about another exciting and very useful activity - about modeling with kids and how you can play if you have a piece of dough on hand. All these games are useful not only for the development of fine motor skills, but also for the development of the child’s imagination, thinking, and perseverance.
Often mothers ask the question: “What is better to choose for activities with the baby: dough or plasticine?” In my opinion, it would be better if you give your child the opportunity to get acquainted with different substances and sensations, and conduct classes with both dough and plasticine. But here for little ones (from 1 year old) it is better to use dough in modeling classes and that's why:
The dough is much softer and more pliable than plasticine, and for babies who still find it difficult to knead plasticine, this is important.
Considering the fact that many kids will want to taste the modeling mixture, the dough ( homemade) from this point of view, it is much safer, since its main components are flour, salt and water, and plasticine is still a combination of chemical components.
You can make the dough yourself, or you can buy it at the store (for example, Play Doh). But if you even once knead the dough at home, then, for sure, you will no longer want to deal with store-bought dough. Homemade dough more flexible, softer, more pleasant, and there’s a lot of it! In addition, the process of preparing the dough is quite simple and does not take much time.
So how do you make play dough? I will give two dough recipes that I have tested several times and I really like. The first recipe can be called classic recipe salt dough. The dough is prepared very quickly and easily; it is often used to create durable crafts; after drying, it can be painted.
Salted play dough - classic recipe
1 cup flour
½ cup salt (preferably “extra”)
½ glass of water
1 tbsp. vegetable oil
Mix all ingredients and knead thoroughly until smooth.
Recipe for very flexible dough
And one more recipe for a very, very soft, plastic, homogeneous and, I would even say, perfect dough!:) It is not suitable for drying and painting, but it is perfect for fun games with dough.

1 cup flour
1 glass of water
¼ cup salt
1 tbsp. vegetable oil
2 tsp citric acid
Combine all ingredients in a saucepan, stir, then place over medium heat. After this, we begin to actively stir the dough with a spoon until it forms a ball and stops sticking to your hands. You will need to stir for no more than 3 minutes. After the dough has cooled, you can start playing with it.
Don't neglect such a seemingly insignificant ingredient as lemon acid! If you do not add it, then after storing in the refrigerator the dough will begin to stick to your hands.
You can add food coloring to any version of the dough. If you don't have dye to tint the dough, you can use beetroot or carrot juice, turmeric, brilliant green, gouache. Well, if you divide the dough into several parts and paint them in different colors, it will be even more interesting!
Both doughs can be stored in the refrigerator in a closed container for quite a long time (several weeks).
Games with dough
So, you have the dough, what to do with it next? First of all, of course, you need to introduce the baby to the test. Give him the opportunity to touch and knead him. You can make some kind of bun or bunny to show what the dough is capable of. If the acquaintance went well, you can move on to games.
Remember that the entire lesson should not last longer than 5-10 minutes. Do not try to include all the games in one lesson, watch your baby and always stop before he gets tired of the activity. If your baby is losing interest in a particular game, it may be too easy or too difficult for him. Try to simplify or make the task easier.
1. Roll out the dough with a rolling pin
The baby will most likely be happy to start rolling out the dough, because he has seen his mother do it more than once. If your baby is having trouble using a rolling pin, help him by clasping his hands with yours.
Both a toy and a real kitchen rolling pin are suitable for the game. My daughter likes rolling with a large rolling pin even more.

2. Press various objects into the dough
Next, you can announce that the resulting flatbread is not just a flatbread, but a pizza or a cake that now needs to be decorated. And for this purpose you can use a variety of objects: matches, pasta, beans, counting sticks, small toys, lids, etc. Try to use objects of different shapes and sizes to diversify the child’s tactile sensations.

3. Create simple crafts based on pressing objects into dough
Let me give you a few examples:
- Hedgehog
 For the little ones, toothpicks can be replaced with matches or counting sticks.

- little man

Be sure to involve your child in rolling out the torso and head. If your baby is not doing well yet, take his hands in yours and make rotational movements together.
4. Pinch off small pieces of dough and place them in a jar/bowl
This activity is very useful for the development of fine motor skills, as it trains the “pinch” grip. It’s quite simple to play around with the activity: invite your child to feed his favorite bear with candy. The game will most likely appeal to the youngest children - children about one year old. At this age, kids really like to tinker with small objects, fold and rearrange them.

5. Prick the dough with a fork.
Try sticking the same candies that you made for the bear onto a fork. You can tell your child that the bear prefers to eat only with a fork, but refuses to eat otherwise. So in the game we will quietly practice a very useful skill.

6. Cut with a knife
The main thing in this lesson is to teach the child to hold the knife correctly and, importantly, to independently hold the dough with his left hand (if the child is right-handed). A toy plastic knife, a special plastic dough knife, or a butter knife work well for the game. The activity will be interesting for babies from about 1 year 3 months.

7. Leave fingerprints on the dough
We press the toy into the dough, carefully remove it and ale-op, you get a beautiful pattern on the dough! Taisiya was simply delighted with this activity, and could get carried away for a long time, imprinting pasta on the dough.
Good for printing sorter figures, pasta tubes, small toys, construction set parts, fork, comb . Well, if according to the test, a car passes by, leaving marks (preferably with large wheels and treads on them), then the baby will most likely appreciate it.

And, of course, it’s worth mentioning the cookie cutters separately. With their help you can not only make beautiful prints. With older kids, you can try removing the “extra” dough around the molds so that you get “cookies”.

Prints can also be made simply with your finger. After which it will be very interesting to “sow” seeds into the resulting holes. This will be another great exercise for developing a “pincer” grip.

8. Pass the dough through a garlic press

9. Put the dough into a mold - make a pie
You can use either muffin tins or clean tins from the shortbread set for this game. When putting the dough into the mold, we try to compact each piece thoroughly. Most likely, you will have to get the cake out of the mold with your mother’s help, because... this is not an easy task.

10. Hide surprises in the dough and find them
This is our favorite game. I think all children love it when there is a surprise moment in the game. They are ready to open intricate locks, unscrew stubborn lids, just to see what is hidden behind them. Children are happy to find surprises, even if they hid them themselves!
Therefore, in this lesson, first, together with the baby, we hide the toy in the dough, placing it on one half of the cake and covering the other. Older kids can be asked to pinch the edges, as when sculpting a pie. Mom can do this for younger children. Well, then we ask ourselves the question “Where is our hedgehog?” or “Oh, who’s hiding here?” Perhaps during the first games the baby will have to be shown how to “get to” the toy. Most likely, the baby will catch everything very quickly and will subsequently eagerly pick apart the dough himself.

Even such a seemingly simple activity is incredibly useful for children’s fingers.
11. With mom’s help, sculpt sausages, koloboks and simple figures.

That's all for me, I wish you pleasant games together and more happy smiles on your baby's face! I would be very grateful if you share this article with your friends on social networks (there are special buttons for this at the bottom of the article). Well, in order not to miss new articles, subscribe to updates in Instagram,
An article for those who like to be creative with their children. It contains recipes for salted play dough and many ideas for crafts.
Modeling is a fun and useful activity at the same time. By making figurines, paintings, and compositions from plastic material, the child develops imagination, logical thinking, fine motor skills, and learns perseverance.
Of course, mom can just buy plasticine or some branded modeling compound for the baby. But how high quality and environmentally friendly are these materials? As an alternative, you can use salt dough made with your own hands from inexpensive natural products.
How to make dough for crafts?
Environmental friendliness is not the only advantage of salt dough over plasticine or play-doh.
- The recipe according to which the plastic mass is prepared does not cause any difficulties for absolutely anyone. If a child asks to sculpt while at the dacha, for example, and there is no plasticine at hand, his wish can be fulfilled in half an hour
- Materials for modeling in the store are quite expensive. Ingredients for salt dough will cost much less
- Salty dough, even the one to which paint has been added does not stain your hands or stick to your fingers. It's soft and pliable
- Crafts made from dough can be dried using a special technology. Then they will be stored for a long time and serve as a souvenir, Christmas tree decoration, or children's toy.
IMPORTANT: Even in ancient times, people mastered modeling from dough with salt. A whole art arose, which was called testoplasty. Women and children made very elegant crafts, painted them by hand and used them as decorations for their homes. Figurines symbolizing various benefits were considered expensive gifts, given only to close people. Our ancestors didn’t bother with the salt dough recipe, making the material only from water, flour and salt
Today, salt dough modeling, which has suddenly returned to popularity, is called bioceramics. The recipes for the dough itself are being improved. Unfortunately, some of them involve the use of wallpaper glue, synthetic paints, etc. The concept of absolute naturalness is lost.

Salt play dough has three main components. This:
Additionally widely used:
- gelatin
- starch
- vegetable oil
- natural dyes (beet juice, green beans, etc.)
- food colorings
- gouache or watercolor paints
- PVA glue
- wallpaper glue
Glue or starch makes ready-made dried dough figures more durable, but it is not advisable to add them to material intended for children under 5 years of age. But dough with butter can be greasy and stain your clothes.
IMPORTANT: You can color both the dough itself while it is being prepared and the finished figurine, then creativity will be doubly more interesting and useful

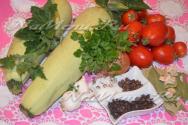
RECIPE No. 1. Simple dough
You need: wheat flour – 1 cup, extra salt – 1 cup, cold water – 0.5 cups
First of all, the dry ingredients, flour and salt will be combined. If the dough is colored with food coloring or paint, dissolve it in water. Gradually adding colored water to flour and salt, knead a fairly stiff dough, but such that it does not stick to your hands and does not crumble into crumbs.
IMPORTANT: To check whether the mass is suitable for modeling, roll out a smooth ball and press a hole in the middle of it with your finger. The dough should neither spread nor immediately return to shape. The edges of the recess should remain smooth
RECIPE No. 2. Dough with starch
You need: wheat flour - 0.5 cups, starch - 0.5 cups, extra salt - 1 cup, water - 0.5 cups.
Just as in the first case, first mix flour, salt and starch. Next, clean or colored cold water is gradually added. Modeling mass that contains starch becomes more elastic.
In addition to the saltiest modeling dough, you need to prepare:
- dostochku
- knives - stacks
- molds (such, for example, come complete with play-doh dough)
- beads, sequins, buttons, other improvised materials for decorating crafts
IMPORTANT: The flour and salt dough can be used several times in a row. To prevent it from drying out, place the material in a plastic bag or wrap it in cling film, then close it in an airtight container and put it in the refrigerator.
How to dry dough crafts?
If the dough crafts are small, they will dry out on their own. To prevent cracks from appearing on their surface, they are removed from direct sunlight.

You can also dry the dough figures in the oven at a minimum temperature and always keep the door ajar. Dry the dough in the oven for 3 – 6 hours, depending on the size of the craft. It goes into the oven three times for 1 - 2 hours, with a short break between each time.
Making salt dough with children
You can offer salt dough to your baby for the first time at the age of 1 year. This is not chemical plasticine or play-doh; mom doesn’t have to worry if the baby tastes the material or swallows it. For such small “homemade products”, the dough is prepared without synthetic dyes.

IMPORTANT: Play dough is very salty. As a rule, it is enough for a child to lick it to understand that it is not edible. But if the baby still ate a piece, you just need to give him plenty of drink, and if the mother is still worried, a bag of Smecta
Full-fledged developmental modeling classes are possible with children from 2 years old. From rolling out circles and balls from salt dough, they will smoothly move into real creativity, in which kids will be able to make flowers, animals, favorite fairy-tale and cartoon characters, etc.

The finished result of dough modeling is as important for kids as the process itself. The finished craft evokes strong positive emotions in them.
Crafts from dough for children in kindergarten
There is no need to think that salt dough is a “handicraft” material exclusively for home use. Teachers kindergarten They have long taken note of recipes for plastic materials and are happy to replace plasticine with them in developmental classes with students.

So, in nurseries they often make casts of baby hands, circles, mushrooms, “sausages”, snails, etc. In older groups, children are already working on themed crafts, for example, for the holidays.
Crafts from dough for kids. Step-by-step dough crafts
When making dough with kids, you don’t need to come up with ideas for crafts: usually, they are born by themselves the moment your fingers touch the plastic material. Children love to sculpt:
- geometric figures
- flowers and trees
- fruits and vegetables
- animals
- dinosaurs
- little men
- fairy-tale creatures
- cartoon characters

Adults, mastering testoplasty, can get ideas on the Internet, there are many step by step wizard classes.
IMPORTANT: Good guides for both children and beginning adults are the books “Salt Dough Step by Step” by V. Khomenko and “Miracles from Salt Dough” by A. Firsova
Templates for crafts made from dough. Children's crafts made from salt dough
Crafts made from salt dough can be very beautiful. Children's crafts have their own touching charm. Adults are like pottery.
To get inspired for creativity, you can view a selection of thematic photos with crafts made from salt dough.
Panels and pictures made from salt dough
Such works of bioceramic art can be hung on the wall or placed in a prominent place. Photo frames made from salt dough are also very beautiful.


New Year's crafts made from salt dough
On New Year From the dough you can make not only Christmas decorations, but also gifts - souvenirs for friends in the form of the symbol of the year. In 2016 this is a funny monkey.


Crafts made from salt dough heart
The heart is a symbol of Valentine's Day. Made with your own hands from flour, salt, water and, of course, love, it will turn into a very valuable gift.
A cute angel made from salt dough also looks very cute.


Aircraft craft made from salt dough


Crafts from dough for March 8th. We make flowers from salt dough. Craft roses from dough
Any mother will be touched by a craft given to her by her beloved child for the holiday of March 8th. Most often these are flowers, bouquets, floral arrangements. Roses made from dough will never wither.


Magnificent basket with flowers.
Crafts from dough for Maslenitsa. Easter crafts made from salt dough


Easter crafts made from salt dough will add a special flavor to the bright holiday
Animal crafts made from salt dough
Together with your baby, you can fashion a whole zoo out of salt dough!


On our website you can see many different crafts created based on salt dough.
Here one of the recipes for the manufacture of salt dough:
1Mix a glass of flour and 1 glass of salt.
Then pour in 125 ml of water(the volume is approximate, because the amount of water may depend on the type of flour you used for the dough). Stir this mass again with a spoon, and then knead with your hands until a homogeneous consistency. Some people use a mixer for this purpose.
By the way, water can be replaced with jelly made from potato starch(dissolve 1 tbsp starch in 1/2 cup cold water. Then pour another 1 glass of boiled water into this liquid, stirring. When the jelly thickens and becomes transparent, remove from heat. received the paste). The dough will only benefit from such a replacement - it becomes more plastic.
Just don't overdo it! If the dough is too soft, knead it with a little extra flour and salt mixture. Salty dough there must be dense.
Now you can sculpt! It is better to sculpt on a sheet or board - this is a good place for drying. The drying itself is carried out at a temperature of +80C in the oven for an hour, or on a radiator (in winter). The drying time depends on the thickness of the figurine.
If you need color salty dough , then it can be colored either at the kneading stage, using food coloring or gouache, which is convenient when working with small children; or paint the finished product after complete drying.
And our craftswomen have their own subtleties and secrets for working with salt dough. That's why , go to the blog , Whose work did you like and ask! I’m sure the craftswomen will be happy to share with you!
P.S. Reminder on how to make the required color:
cyan = blue + white
pink = white + red
purple = blue + pink
green = blue + yellow
orange = yellow + red
brown = green + red
emerald = green + blue
flesh = light pink + a little yellow
gold and silver will be obtained if you add the corresponding color of gouache or acrylic, in the same way you can get glitter dough(gel for gouache)
When working with salt dough many come up with amazingly beautiful names - testoplasty , bioceramics and even, flour ! But whatever you call it, the result sometimes exceeds all our expectations! The birth of a salt dough masterpiece is always an event! Happy creativity and peace to everyone!
Modeling is a very fun educational activity that is loved by many kids. Step by step recipe salted modeling dough for children will help parents make with their own hands a natural, absolutely safe, inexpensive plastic material that will be an excellent alternative to plasticine and the popular modeling mass such as play-doh.
Salted play dough for children recipe:
What is salt dough? How is modeling useful for children?
Dough made from flour and table salt is an incredibly plastic material, and modeling from it is an art known to our distant ancestors. Folk craftswomen mastered testoplasty, or bioceramics (today handicrafts have such beautiful names) to decorate their homes and bring home comfort to them. They made crafts from salt dough without baking and painted them. These figurines had a symbolic meaning and were given to loved ones. The children played with them like toys. Initially, the plastic mass recipe included only three components: flour, boiled salt and cold water.
Today, salt dough is once again popular. Many parents and teachers preschool institutions I prefer this material to plasticine and play-doh plastic mass, because:
- Salted play dough for children recipe is very simple, anyone can master it.
- The components for preparing the plastic mass are inexpensive and accessible. Flour, salt, water, food coloring and other ingredients will cost less than plasticine.
- For young children, you can use a mass recipe that contains only natural edible ingredients. There will be no reason to worry if the baby decides to try what the dough tastes like or swallows a piece of it.
- Salt dough does not stick to your fingers and does not stain them. This is a very pliable and soft material, which can be used to form figures. strength even for kids.
- Properly prepared and kneaded salt dough dries, hardens, and does not crack. Crafts made from it can be used as souvenirs and Christmas tree decorations. They can be played like toys.
- Using natural coloring agents (beet juice, for example), food coloring, puff pastry can be given absolutely any color.
Recipes for salted play dough
Recipes for salted play dough for children are constantly being improved. Some people prefer to add not only water, flour and salt to the material, but also some other components, for example, starch, gelatin, vegetable oil, PVA glue or dry wallpaper glue. But the main thing here is not to overdo it! Buttered dough, for example, can leave greasy marks on hands and clothes, and the synthetic glue makes the material only suitable for children 5 years and older, who definitely won't eat it.
Parents are offered two recipes for salt dough for creativity with preschoolers and junior schoolchildren, step by step with photos.
Recipe 1: A simple recipe for salted play dough
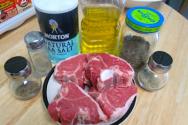
Ingredients:
wheat flour – 1 cup;
fine table salt (Extra) – 1 cup;
cold water – ½ cup;

How to knead the modeling mass:

Recipe 2: Recipe for salted dough with starch
For making miniature crafts, a mass with starch is more suitable; it will give it additional elasticity.
Ingredients:
wheat flour – 1/2 cup;
table salt – 1 glass;
cold water – ½ cup;
starch - ½ cup.

How to knead starchy salted dough for modeling:


Craft ideas for kids using dough
As a rule, ideas for crafts made from salt dough arise directly during the modeling process. But if they have dried up, you can study one or another interesting master class from the books by V. A. Khomenko “Salt Dough Step by Step” or A. Firsova “Miracles from Salt Dough.” Schemes and step by step instructions with photos and videos for crafts are available on the Internet.
Foot and palm prints on the dough, stuck on cardboard and inserted into a frame, look very original.

For the New Year, it’s fun to make cute Christmas tree decorations with your child, color them, decorate them with beads, sequins, and sprinkle them with sparkles. A snowflake, a gnome, a hut, a bell, or a symbol of the year, for example, a monkey, can hang on the tree. As an example, here is a photo of a craft made from salted modeling dough, made together with a 4-year-old preschooler.

Salt dough - a recipe for crafts. Video.
Modeling dough from salt and flour is a type of creative activity that a child can begin to master literally from the age of one. By manipulating with tactile pieces of colored dough, he is not just having fun. Modeling promotes the development of fine motor skills, imagination and memory in preschoolers and primary schoolchildren, and helps to form an understanding of the properties of objects.
Tactile contact with salt dough, the actual process of making crafts has a calming effect on the baby’s psyche, and the end result causes a storm of positive emotions.
Working at home with children and developing them is a pleasure if the activity is exciting and has a lot of advantages. Crafts made from salt dough are just what you need, because it is a pleasant pastime for mom and a useful exercise for little children’s hands. In addition, modeling from salt dough is very affordable: the ingredients can be found in every home.
How to make salt dough
There are many recipes for such a dough, and to make a plastic mass with your own hands, choose the one that suits you, but first read some clarifications:
- flour - without additives (not “pancake”);
- salt – fine, “Extra” (not rock, not iodized);
- if the dough is colored, it needs to be divided into parts during the process;
- dyes - beet juice, spinach, raspberry, blueberry juice, dry food coloring, gouache.
Recipe for simple and colored dough
Ingredients for a simple test:
- 200 gr. flour;
- 200 gr. salt;
- 125 ml ice water.
Preparation:
- Mix flour and salt in a large bowl.
- Add water in small portions, kneading the dough until smooth.
- Place it in a bag and put it in the refrigerator to rest for half an hour.
Ingredients for color dough:
- flour - 300 gr.;
- salt - 300 gr.;
- cold water - 200 ml;
- sunflower oil - 1 tbsp. spoon;
- dyes.
If the dye is liquid:
- mix flour with salt;
- add vegetable oil;
- add water in portions, knead the plastic dough;
- divide the mass into several parts and mix the dye into each part, knead until a uniform color is obtained;
- put in the refrigerator for 30 minutes.
If the dye is dry:
- divide all ingredients into equal parts;
- each dye must be dissolved in approximately 1-2 tablespoons of water from the total volume;
- mix flour, salt, butter, add water and dye, knead thoroughly;
- We do this with each color;
- put it in a bag and put it in the refrigerator for half an hour.
Little tricks
Experienced housewives know that the more flexible the dough, the more elegant the crafts are. To do this, vegetable oil is added to the mixture. It can be replaced with hand cream in the same amount.
For thin parts, you can make a special dough by adding a little starch or wallpaper glue: 1-2 tbsp. Mix dry spoons with water and add to the mixture of flour and salt.
The dough can be stored in the refrigerator for 1-2 weeks.
Testoplasty - where to start
Modeling from salt dough is an interesting process that will bring pleasure to everyone. The dough turns out so soft and pliable that you don’t want to let go of it. Therefore, for some needlewomen, dough crafts - testoplasty - are not just periodic activities with children, but a real hobby.
The youngest children can be introduced to dough as the first material for modeling. The dough is superior to plasticine because it is harmless to children. If a young researcher has tasted the mixture, do not worry, the dough does not contain foreign impurities or harmful additives. The child can do whatever he wants with the dough: knead it in his hands, pinch off pieces, roll it into balls, sausages, cut it with a knife. Such manipulations are useful for fine motor skills.
For children aged 2-3 years, simple crafts are enough. First, these are flat dough shapes that are cut out using cookie cutters, round lids, or a clay knife.
Children over 4 years old are ready for crafts that are more complex than just cutting with a shape. These can be Christmas tree decorations, three-dimensional animal figurines, vegetables, fruits, small toys as gifts for friends. Using salt dough you can make wonderful counting material for teaching mathematics in the game.
Salt dough toys for children
You can start with simple flat products. Let these be cookies for dolls or other toys; they will last a long time and fit perfectly into a toy tea party. These cookies can be made right away from colored dough, or they can be made from white dough and then painted. You need to glue small parts to the main product and connect the parts of the craft to each other using a damp brush: the parts to be joined are moistened with a brush and glued together.
"Ginger cookie"
Let's do salty cookies step by step:
- Roll out a small piece of dough with a rolling pin into a thin layer (5-7 mm) on the table;
- using cookie cutters or plasticine, cut out figures;
- we decorate the figures with seeds, beads, small buttons;
- You can place small dough decorations on top of the cookies - circles, hearts, flowers.
Application "Caterpillar"
Using the same principle, you can make an applique craft from colored dough on thick cardboard. We will need a sheet of cardboard, dough of different colors (yellow, pink, blue, green), a plasticine knife.
Execution steps:
- take pieces of yellow (head), pink and blue, roll out to a thickness of 7-10 mm;
- cut out circles from dough;
- grease the cardboard with PVA glue, glue the circles (the body and head of the caterpillar);
- cut out eyes and decorations for the caterpillar with a knife (beads, flowers, bows - optional);
- using a toothpick, draw a smile, make a pattern on the caterpillar (dots, notches, waves);
- glue the eyes and decorations onto the caterpillar’s body using a wet brush;
- cut out leaves and grass from green dough and glue them to the bottom of the cardboard;
- we complement the picture with elements to suit your taste: the sun, flowers in the grass, legs for a caterpillar;
- dry the craft in air or on a radiator.
Christmas decorations
On New Year's Eve, you can make your own Christmas tree decorations from salt dough. This is a reason to start a pleasant tradition - every year to make a new toy with your child. Even a simple toy in the shape of a star or a heart, or maybe some kind of animal (symbol of the year), decorated with beads, bows, and ribbon is already a masterpiece. You can make a snowman, a Christmas tree, or Santa Claus's mitten.
New Year's decorations are made on the same principle as cookies. We need to roll out the dough and cut out the shapes of the desired shape. If you don't have a stencil, simply cut out a sample from cardboard, place it on the dough, and then trace it with a knife. Don't forget to make a hole for the ribbon. Decorate the toy now or after drying, paint it, varnish it, and it will serve you for many years.
After the child has learned to decorate flat figures, you can begin to master three-dimensional figures. To make the crafts light, a ball of crumpled paper or foil is placed inside the product, which is “covered” with dough. This technique reduces drying time.
Before you move on to sculpting three-dimensional figures, teach your child to roll sausages, roll them into snails, make balls of different sizes, shape them into cubes, and flatten them into flat cakes. These basic skills are necessary for independently sculpting even the simplest animal figures.
Making a hedgehog
A hedgehog made from white salted dough can become the first three-dimensional figure made by a child’s hands. Let's sculpt a hedgehog step by step:
- We roll a ball out of foil, and then form the body of a dough hedgehog around the ball - a figure similar to a pear. If you don't put foil inside the body, drying will take a long time and the hedgehog will be heavy.
- We make eyes and a nose: you can take black dough for the nose and peppercorns for the eyes, you can make everything from white dough, and paint it with paint after drying.
- Now we take nail scissors (adult help is needed) and make needles for the hedgehog. We start with the head, then cut the dough all over the body to make sharp triangles. Just cut the dough and you will understand how to do it. If you do the rows in a checkerboard pattern, it will be more beautiful.
- When our hedgehog is dressed in quills, he can be sent to dry and then painted.
Let's make a lamb
You can try making a figurine of a lamb or sheep together with a 5-6 year old child. For this craft you will need the simplest white dough. Next, follow the step-by-step instructions:
- We make 4 balls - these are the legs of a lamb, and place them next to each other in the shape of a square.
- We make a flat cake from a piece of dough, roll a dense ball out of foil, and place it in this flat cake. We “tighten” the foil ball with mass, we get the body of our lamb, and then we put it on the legs.
- Roll a piece of dough into a ball - this is the head, glue it to the right place.
- We make eyes from two small koloboks and place them on the head.
- We roll two sausages, twist them into snails - these are the horns of a lamb, attach them to the head and body with a wet brush.
- We make ears: we fasten a dough cake at one end, we get something like a petal, we do the same with the second, glue them to the head.
- Finally, you need to make curls. To do this, roll many, many small balls (0.5 cm in diameter), place them on the body (back, sides), and flatten them with your finger. We do this until the entire craft is covered with “curls”.
- The workpiece is ready. All that remains is to dry it, paint it and varnish it.
Making counting material for children
Dough figures can be used for beauty, as a gift, or you can make counting material for doing math with children in a playful way. To do this, you will have to work hard and stick a lot of objects of the same shape, at least within ten, but how fun it will be later! You can sculpt vegetables, fruits, confectionery, toy sausages, loaves, mushrooms - everything you can imagine. Here are just a few examples.
Beads "Mushrooms"
In order to stick mushrooms, we take ordinary salted dough, roll the sausage, cut it into small cylinders - these are the legs of the mushroom. Now roll a small ball and press the dough from one edge, giving it a hat shape (you can use a pencil).
We make 10-15 such “leg-hat” pairs. Then we make a hole in the legs of such a size that a cord can fit through it; you can use a wooden kebabs skewer or an awl. We connect the caps with the legs with water, dry them in the oven, and paint them.
Such mushrooms can be strung on a string, or you can stick skewers into a piece of foam plastic or a cork board and string them onto the resulting rod.
Vegetables and fruits
Making vegetables or fruits from dough for games and activities is no more difficult than fungi. Choose crops according to your taste and performance capabilities: cucumbers, carrots, tomatoes, corn or even cabbage. You can use colored dough, or you can make it from white dough and paint it after drying.
Playing with your baby with such toys is a pleasure. You can feed the little animals, divide vegetables between them, and at the same time learn to count, put them in baskets - one more, the other less, you can come up with a lot of games. The most important thing is that the child will not even think that you are trying to teach him, because the game is fun.
From the dough you can make an educational lacing toy - this is a plate with holes into which the child inserts the end of a lace or rope. The toy is useful for developing fine motor skills.
Making such a craft is not difficult. Roll out a layer of white dough about 8 mm thick, take an oval-shaped object (for example, slightly flattened tape, but other options are possible) slightly smaller than your palm. Then, using a stick or pencil, we make an arc-shaped indentation, marking the ladybug’s head, and draw a straight line dividing its wings. Using a felt-tip pen cap, we make dot-holes - the excess dough falls into the cap, and we get a hole. 3-5 holes on each wing is enough. We dry the future lacing, then paint it. The toy is ready.
How to dry dough crafts
Each finished craft needs to be dried. How long it takes depends on the drying method. There are several drying options, choose the one that is convenient based on the size of the product or the availability of time.
Choosing a method for drying products:
- Air dry on a flat surface. It will take a long time to wait for the result; it takes a day for 1 mm of the thickness of the craft. Indentations may appear where the dough comes into contact with the surface, and sometimes you cannot turn the craft over. This option is suitable for small flat products.
- Drying on a radiator. This method is only possible during the heating season. Drying on a radiator takes less time than drying in air. The process takes from 1 to 2 days, depending on the thickness of the product.
- Baking in the oven - relatively quick way, suitable for large products. You need to dry the craft on a baking sheet.
If there are sudden changes in temperature in the oven, the product may crack, so you need to start drying with the door open, gradually increasing the temperature:
- at 50 degrees - 1 hour with the door open;
- then at 75 degrees - 1 hour, the door is closed until drying is complete;
- then at 100-120 degrees - 1 hour;
- complete drying at 150 degrees – 30 minutes;
- open the door and leave the product to cool.
Combined drying is also possible. First, the craft is dried in the open air or in a radiator, and then in the oven. Suitable for large products.
The time and temperature for baking the craft in the oven depends on the color of the baking sheet and the thickness of the product. The article indicates the temperature for a light baking sheet; on a black one, make an adjustment - 20 degrees lower. The drying time is indicated for products up to 2 cm thick; if the craft is thicker, the time increases by about 1.5 times.
After drying, you need to lightly tap the product: if the sound is loud, the craft has dried. A dull sound indicates that the dough inside is wet, it needs to be dried, otherwise the craft will begin to collapse.
Painting of finished products
When the salt dough craft is completely dry, you can start painting it. Paints can be acrylic, watercolor or gouache.
Acrylic paints adhere well, do not smudge, and do not leave marks after drying. Watercolor and gouache paints need to be fixed with varnish after drying. You can also varnish any product if you wish - it is durable, beautiful, and looks more elegant.